Search guides for Operations, Live views, Setup, and integrations — or use /guide in chat.
Popular topics
Getting started with OSTRATA
Overview
OSTRATA is a CRM workspace where you manage records (contacts, deals, custom objects) and work with Pilot — an AI assistant — in Operations.
Admins configure the data model and access in Setup. Members spend most of their time in Operations (chat) and Views (saved live views).
On first login, a setup guide walks you through the essentials (workspace integrations for admins, personal connections for everyone). Reopen it anytime from the Setup chip next to Help in the top nav.
Use plain language for CRM tasks (search, create, update records). Use /guide when you want to learn how the platform itself works.
Operations — chat with Pilot; threads, slash commands, record cards
Views — AI-generated mini-apps over your data
Setup (admin) — objects, fields, permissions, integrations, API keys
Personal space — connect your Calendar, Gmail, and Telegram
Setup guide — checklist + tips; progress chip stays in the nav
An object is a record type — Contacts, Companies, Deals, Cases, and any custom types your admin creates. Each object has its own fields and permissions.
Standard objects — built into OSTRATA (Contacts, Deals, etc.)
Custom objects — added in Setup → Objects for industry-specific data
API name — stable identifier Pilot and the REST API use (e.g. contacts, deals)
Records
Each row is one record — one contact, one deal, one case
Records store values in fields defined on that object
Notes and attachments are children of the record, not schema fields
Pilot creates, searches, updates, and lists records in Operations
Live views and web forms read records from one object at a time
Who configures objects
Workspace admins define objects and fields in Setup
Members work with records in Operations and Views — they do not change schema
Bulk import (Setup → Data import) loads many records from CSV or Excel
Think of objects as tables and records as rows. Fields are the columns.
Fields and field types
Fields
Every object has fields — name, email, stage, amount, etc.
Label — what members see on record cards and forms
API name — fixed after creation; Pilot maps natural language to this name
Field order — drag to reorder on the object; affects Operations cards and web forms
Text & contact
Text (short) — single-line text, names, titles
Text (long) — multi-line notes and descriptions
Email — validated email addresses
Phone — phone numbers
URL — web links
Numbers & dates
Number — integers or decimals
Percent — percentage values
Currency — money; uses workspace default currency for formatting
Date — calendar date without time
Datetime — date and time (timezone-aware display)
Auto number — system-generated sequential IDs
Choice & location
Select (picklist) — fixed list of options; order affects dropdowns
Checkbox — true/false flags
Country — ISO country selection
Address — structured street, city, region, postal code, country
Lookup (relationships)
Lookup is a field type that links a record to one record on another object. See Relationships between objects for how links work in Pilot and related-record panels.
Use clear API names (deal_stage, not field_3). Pilot uses them when creating and filtering records.
AI field types
AI field (Long text) — AI-generated summary and next-action recommendation from record context, written in the workspace language (Setup → Settings)
AI field (Score) — AI-generated score from 0 to 100; optional scoring prompt on the field
Read-only — members cannot type values; generation runs on save (except bulk import) or via manual refresh
Status — generating while AI runs, ready when complete, error when generation fails
Batch generation — workspace admins use Setup → AI and Agents to fill many records at once
All field types (reference)
OSTRATA supports the following field types when creating columns in Setup → Fields.
Text (short) — single-line text
Text (long) — multi-line notes and descriptions
Email — validated email address
Phone — phone number
URL — web link
Number — integer or decimal
Percent — percentage value
Currency — money; uses workspace default currency
Date — calendar date without time
Datetime — date and time
Auto number — read-only sequential ID assigned on create
Select — fixed picklist of options
Checkbox — true/false flag
Country — ISO country selection
Address — street, city, region, postal code, country
A lookup field on object A points to one record on object B
Example — Case.Contact points to a Contact; Case.Company points to a Company
When you set a lookup, OSTRATA stores the link and a display name for Pilot
Clearing a lookup removes the link; deleting a record may orphan lookups that pointed to it
Designing relationships
Add a lookup field on the “many” side — many Cases can point to one Contact
Choose target object when creating the field in Setup → Fields
Name fields clearly — contact, company, deal — so Pilot understands intent
One lookup = one related record; use separate fields for multiple relationship types
Reverse lookups
When viewing a Contact, Operations can show Cases that link to that contact
Reverse relations are discovered automatically from lookup fields on other objects
Related-record panels in Operations list linked records without manual configuration
Pilot & permissions
Pilot resolves lookup values by display name when creating records (e.g. “contact: Sarah Chen”)
Members need view access on both objects to see linked records
Field-level permissions can hide lookup columns from certain profiles
Define objects first, then add lookup fields to connect them. Pilot needs both sides to search and relate records. Use a Users lookup for Owner or any member assignment.
Record ownership
Every record has a required Owner (workspace member), defaulting to the creator
Reassign Owner when your permission profile allows edit on that field
Ownership is assignment metadata — it does not hide records from other members with object access
Tasks, assignees & reminders
Tasks require an Assignee (Users lookup)
Due date is a date-time
Enable Set reminder to choose Reminder at — the assignee gets an in-app notification when it fires
Notification bell
The bell in the dashboard shows recent notifications with an unread count
Sources include task reminders, platform announcements, and job completions
Clear removes notifications (they are deleted, not just marked read)
Bulk data import
When to use import
Moving data from a spreadsheet or another CRM into OSTRATA
Loading hundreds or thousands of rows in one guided job
Re-importing an updated export to refresh existing records (Update duplicate mode)
Creating primary records and related records from one export (e.g. contacts with company columns)
Supported file types
CSV (.csv) — comma- or tab-separated exports
Excel (.xlsx, .xls) — first worksheet is used; extra sheets are ignored
First row must be column headers; blank data rows are skipped
Column headers must be unique within the file
Limits
Maximum file size: 10 MB
Maximum data rows: 10,000 (excluding the header row)
One primary object per import job
Optional one embedded related object per job (e.g. Companies on a Contacts import)
Split very large migrations into multiple files or jobs. Remove summary rows, totals, and footers before export.
What imports can do
Create new records on any standard or custom object
Update existing records when a row matches (email, phone, or name — see duplicate handling)
Create or update related records from the same file and link them via a lookup field
Map picklist/select values by label or internal value
Import dates, currency, URLs, email, phone, and text fields
Sync imported Events to Google Calendar when the importing admin has calendar connected
What imports cannot do
Write auto-number fields — OSTRATA generates these; map legacy IDs to a text field instead
Generate AI field values — bulk import skips AI; use Setup → AI and Agents after import
Override computed quote totals or other read-only calculated fields
Import partial data when validation fails — all rows must pass before anything is written
Change object schema mid-job — field layout is frozen at validation
Members without an assigned seat are guests. Operations shows a locked overlay for guests — ask a workspace admin to assign you a seat to chat with Pilot.
Slash commands are optional shortcuts. Plain language works for the same tasks.
Type / in the composer to see autocomplete. Some commands accept an object name after a space.
/create — add a record (or start a create form)
/list — list records for an object with optional filters
/find — search records (natural language also works)
/guide — ask how the platform works (setup, views, integrations)
/help — alias for /guide
Live views — ask in plain language, e.g. “Create a kanban of my deals by stage”
/update and /link — use plain language to change or relate records
Creating and updating records
Overview
Pilot can create and update CRM records from Operations using plain language or slash commands. You need create permission on the object (check with your admin if a create fails).
For a guided empty form, use /create with an object name. For a one-shot create with field values, describe the record in plain language or pass name:value pairs.
Plain language: “Create contact name: Sarah Chen email: sarah@acme.com”
Slash command: /create contact name: Sarah Chen email: sarah@acme.com
Empty form: /create contact — Pilot opens a draft you can fill in
Natural phrasing: “Add Annie Moreau as a contact” or “Create a new deal called Q1 Renewal”
Relative dates: “Create a task for tomorrow” — Pilot uses the workspace clock (demain / tomorrow / next Friday), not a guessed year
Updates: describe the change in plain language, e.g. “Update Sarah Chen’s stage to Closed Won”
Pilot maps your words to workspace objects and fields defined in Setup → Objects and Fields
Use /guide (or ask “how do I…?” in plain language) when you want help using OSTRATA — setup, Pilot, views, integrations, permissions, and how to create or find records.
For direct CRM actions with specific values, skip the how-to phrasing: “Create contact name: Sarah Chen email: sarah@acme.com”.
/guide — show usage and link to full documentation
/guide how do permissions work?
/guide how do I connect Google Calendar?
/guide what are live views?
/guide how do I invite a member?
/guide how do I create a contact?
Plain language also works: “How do I create a contact?”
When an admin enables French registry integration, any member with Companies access can enrich records from plain chat in Operations — English or French.
Create a company — “Create company Acme SAS” / « Crée la société Acme SAS » — choose standard creation or registry-enriched context when integration is enabled
Enrich a company — “Enrich Acme France from the registry” / « Enrichis cette société »
Search registry — find matches by name or SIREN before applying to a record
Dirigeants — list officers, then import selected contacts
BODACC — fetch announcements; approve or dismiss pending changes
In Telegram direct chat, tap inline buttons or reply with the option number or SIREN
If integration is disabled, Pilot explains that an admin must enable Setup → Integrations → French registry
Ask Pilot to open email compose for a contact in Operations, or use Write email on a Contact or Case record card.
The compose panel opens with the recipient prefilled. Add optional instructions, use ✨ Draft with AI when you want a subject and body from CRM and Gmail context, edit as needed, then click Send. Nothing is sent until you confirm — emails go from your personal Gmail.
Natural language: “Write a next steps email to Sarah Chen” opens compose with instructions prefilled
Record card: expand a Contact (or Case with a linked contact) → Write email
Live views: add data-compose-email buttons and call OSTRATA.composeEmail({ contactId })
✨ Draft with AI uses CRM + Gmail thread history when Gmail read access is connected
Send requires Gmail connected with send scope on Personal → Connect
Every CRM record has a notes timeline. Notes are children of the record — like attachments — not a schema field.
On an expanded record in Operations, Notes then Attachments sit on the left under the name (yellow outline), on the same row as Open. Notes opens a left panel; Attachments still opens the right panel. Related lists stay in the meta row.
Composer at the top of the panel (if you can update the record) — add a note, no edit after create
Timeline newest first: date, author, first-line preview; expand in place for the full body
Author is the member display name, or System when the note came from a notetaker/integration (source system, or no user)
Delete is available to anyone who can update that object — not author-only
View on the parent object includes reading notes; Update includes create and delete. Guests who can view can read, not write
Pilot can search notes (query_notes) and add notes (create_note). That is not the same as creating a CRM record
Browse and edit CRM records in shared list and kanban layouts. Everyone sees the same starting layout; you can personalize columns and filters for yourself without changing the workspace default.
Who can do what
Roles below are workspace roles. Creating or editing records also depends on your object permissions (Setup → Permissions).
Everyone — open Standard views, search, filter, sort, switch list/kanban when both are allowed
Everyone — save personal columns, filters, and preferred view type (only you see these overrides)
Everyone — organize your sidebar: personal categories, rename/reorder lists, icon and color for yourself
Everyone — create, edit, or delete records when your profile allows it on that object
Everyone — clone the current layout to a Live view to customize further with AI
Workspace admins — add a Standard view for another object (+ in the sidebar)
Workspace admins — remove a Standard view for the whole workspace
Workspace admins — set the shared default columns and filters that members start from
Guests (no assigned seat) — read-only, standard objects only, capped at 25 records
Personal overrides never change what teammates see. Only admin defaults are shared.
Workspace admins create and rename sidebar categories (like Confluence spaces), set each object’s icon and color, and define the shared default columns and filters for a Standard view.
Use the + control to add a Standard view for another object. Choose list or kanban; for kanban, pick a picklist field (many values means horizontal scrolling).
Members can still save personal column and filter overrides without changing the workspace default.
Operations shortcuts and cloning
Overview
Seeded Standard views appear as shortcuts in the Operations header. Up to 5 show inline; more open from the caret menu. The workspace can pin at most 15 Standard views to Operations.
Clicking a shortcut opens a large modal (about 90% of the screen). Use Open in new tab for the full page under Views.
On a record card, Open uses the same overlay and opens that record’s panel when the object is pinned to Operations. Otherwise it focuses the record in the thread.
Clone to Live view creates an AI Live view from the current Standard layout so you can refine it with Modify chat.
Max 15 Operations shortcuts per workspace
First 5 shortcuts are inline; the rest are in the caret dropdown
Deals ships as list + kanban (stage); other seeded views are lists
Record panel: Notes | Attachments under the name (icon + label, same height as Enrich); Mail and Close stay top-right
Enrich a company from Standard views
Overview
When an admin enables French registry in Setup → Integrations, members who can update Companies see Enrich on the company record sidebar in Standard views.
Click Enrich to search the registry by the company name, pick a match, confirm that registry-related fields will be overwritten, then save. AI fields on the record recalculate after enrichment.
Button appears only when registry is enabled and you can update Companies
Search uses the company name on the record (SIREN is not required beforehand)
Confirm overwrites mapped registry fields already filled on the record (name, address, SIREN, legal form, and other mapped fields)
Operations chat enrichment still uses pending diffs for manual conflicts — Standard views Enrich is an explicit overwrite after confirm
Use Dashboards when your team needs a recurring reporting surface — pipeline reviews, activity summaries, leadership snapshots — that stays aligned with your schema without regenerating HTML each week.
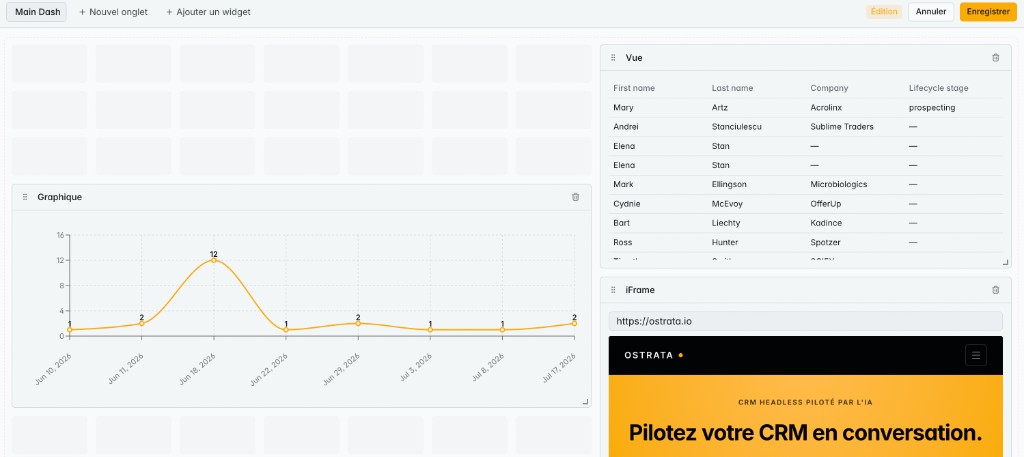
You design the layout once in a visual builder. Teammates reopen the same tabs, widgets, and chart settings from Views → Dashboards.
Where to open them
In the main navigation, open Views, then choose Dashboards. That entry sits next to Standard views and Live views under the Views menu.
Views → Dashboards — create and open dashboard records (grid builder)
Views → Standard views — shared list and kanban layouts for CRM objects
Views → Live views — AI-generated HTML mini-apps from Operations
Dashboards are their own Views entry. You do not create them from the Standard views list.
Create and edit a dashboard
From the Dashboards list, create a record, then open Edit to enter the builder. Arrange widgets on a 12-column grid, add tabs if you need separate reporting slices, and Save so everyone with access sees the same layout.
Create a dashboard record from the list
Open Edit to enter the builder
Add tabs and widgets, then Save
Close without saving discards unsaved layout changes
Charts on live CRM data
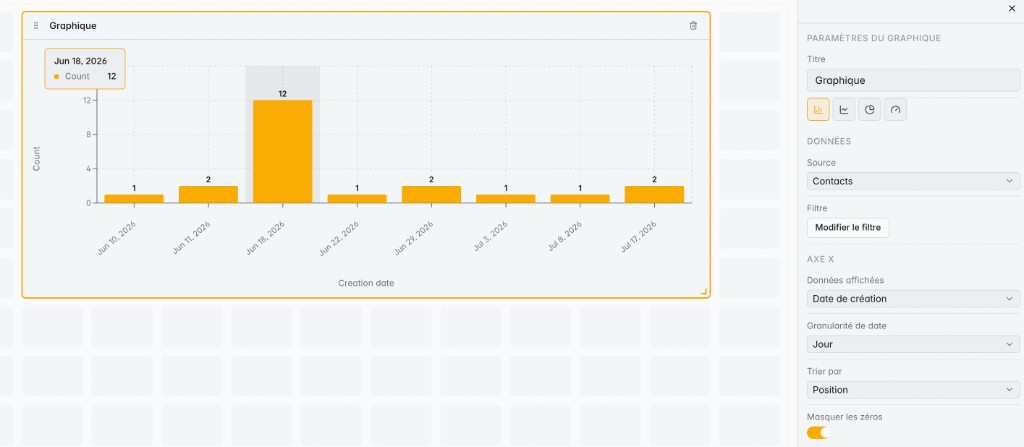
Chart widgets read current workspace records from a source object you pick. Configure type, axes, aggregates, and filters in Chart settings — numbers refresh when someone opens the dashboard.
Bar, line, and gauge charts
Source object from your workspace schema (including custom objects)
Optional filters and relative date windows
Dashboards vs Live views
Pick the surface that matches how the layout should be authored.
Dashboards — you place widgets on a grid; best for persistent, shared reporting
Live views — Pilot generates HTML from Operations (plain language); best for one-off or exploratory layouts
Both respect workspace schema and permission profiles
While editing you see tabs, Add widget, and Cancel / Save. Widgets show drag handles and delete controls on the grid.
Add tabs to split related reporting (for example Pipeline and Activity). Each tab has its own widget set. Save writes the page layout for everyone who can open that dashboard.
Up to 20 tabs per dashboard
Up to 50 widgets per tab
Title the dashboard from the builder header before saving
Close without saving discards unsaved layout changes
Mix chart, view, and iframe widgets on one tab when a review needs numbers and context together.
Saving and sharing
Save persists the layout on the dashboard record. Anyone with permission to open that record sees the same tabs and widgets the next time they open it.
Edits are not live for others until you Save
Cancel exits edit mode without writing layout changes
Reopen Edit anytime to adjust placement or add widgets
All workspace members with access to the underlying objects can open a view from Views or from a thread link.
Views live at /dashboard/views/[id]. Non-owners can view but cannot modify.
Refining a view
Overview
Open a view you own and use the Modify chat dock to describe changes — layout, colors, filters, chart type, column order.
Use the element picker to select part of the view and ask for a targeted change. Pilot regenerates HTML while keeping the original prompt context.
Only the view owner can modify. Others see a read-only version.
Make the kanban columns wider
Add a bar chart for revenue by stage
Filter to deals over $50,000
Use a darker theme for the dashboard
View types and layout
Overview
Pilot chooses layout from your wording: tables for lists, kanban for stage columns, dashboards for multi-widget summaries, charts when you ask for bar/line/pie views.
Mention the object, grouping field (e.g. stage), and any filters in your prompt for best results.
Permissions and data
Overview
Live views respect your permission profile — you only see objects and fields you can read in Operations.
If the workspace has no matching records, the view may appear empty. Date filters (e.g. “created this month”) are applied when seed data is built.
Live view examples
Overview
Copy or adapt these prompts in Operations:
Create a kanban of my deals by stage
Contacts created this month as a table
Kanban of deals in negotiation
Dashboard: revenue by stage with a bar chart
Case queue of open support tickets sorted by priority
Table of contacts at Acme with email and phone
Chart: deal count by owner for this quarter
Modify: make the kanban columns wider
Modify: add a filter for deals over $50k
Modify: switch the chart to a horizontal bar
Regenerate the view with the same prompt but include close date
Setup
What this page is for
Choose a section from the Setup sidebar. The guide panel updates to match the page you are on.
Objects & Fields — define record types and columns
Data import — bulk load records from CSV or Excel
AI and Agents — batch-generate AI Insights and AI Score fields
Members & Permissions — control who can access data
Logs — audit record changes, Pilot turns, and MCP tool use (14-day retention)
Workspace settings
What this page is for
Workspace settings controls branding, onboarding, and org defaults. Everything on this page applies to the whole workspace — not individual members.
Workspace name
The label members see for your organization. It does not change CRM data or object names.
Shown in the Setup sidebar header and workspace switcher surfaces
Used in join-request and approval emails when someone asks to access this workspace
Visible in the Telegram mini-app header when members open OSTRATA from Telegram
Renaming the workspace updates labels immediately after save. Existing records, permissions, and integrations are unchanged.
Pilot name & avatar
Pilot is the AI assistant in Operations. One avatar image is shared for both the workspace and Pilot.
Pilot name — appears on assistant messages, empty states, and thread UI in Operations
Avatar — shown next to Pilot in chat and in Setup; upload JPEG, PNG, WebP, or GIF
Save names — click Save identity after editing workspace or Pilot name
Changing Pilot name or avatar only affects UI labels. It does not retrain Pilot or alter conversation history.
Joining this workspace
The workspace code is how new users request access after creating an account.
Copy the code from the panel at the top of this page and share it with teammates
New users enter the code during onboarding; their request appears in Setup → Approvals
You approve or reject there and assign a permission profile on approve
Default currency
The ISO currency code used for money fields across the workspace.
Controls how money values are formatted in Operations record cards and live views
Applies to new money fields you create after the change
Does not convert existing stored amounts — only display formatting and defaults for new columns
Pick currency before defining money fields if you operate in a single region. Changing later does not rewrite historical values.
Workspace language
The language used when AI Insights are generated for records in this workspace.
Applies to AI Insights summaries and next-action text for every member
Does not change menus, labels, or Pilot chat — those follow each member’s interface language under Personal
Changing language does not rewrite existing insights until you regenerate a record or run a batch job
Set this to the language your team reads on records. Members can still use a different interface language.
Details panel
Read-only snapshot: your role, workspace status, member count, created date
Useful for confirming you are in the correct workspace before making changes
Company & billing
Legal name, address, and billing email for invoices and payment records. This is separate from workspace branding and does not appear in Operations.
Legal company name and address — used on billing documents
Billing email — where invoice notifications are sent
Tax / VAT ID — optional; include if required for your region
When you save changes
Identity (name, Pilot, avatar) — visible to all members on next page load
Language — new AI Insights generate in the selected language; regenerate existing insights to rewrite them
Billing — stored for account records only; no impact on CRM or Pilot behavior
Join code — tied to workspace slug; share the current code after any slug change
Seats
Seats
Self-serve workspaces purchase seats with a Stripe subscription. Seat quantity matches what you selected. Workspace admins assign seats to people.
Platform-granted seats (and existing workspaces without Stripe) work without an active subscription. Setup → Billing is optional unless you buy or manage a paid plan.
Members without a seat are guests.
Buy or change paid seats on Setup → Billing (same result as Pricing; self-serve max 50 seats)
Invite or approve join with Assign seat — seat is consumed when they accept/join
Toggle seat on/off per member (needs an available seat)
Past-due locks access until the card is updated; cancel/unpaid revokes paid seats (platform seats only apply when there is no active Stripe plan)
Guest limits: read-only standard objects (max 25 records), no Operations interaction, no integrations, no live-view sharing.
Billing
Billing
Setup → Billing shows subscription status when you have one, plus invoice profile and card updates.
Self-serve plans start a 30-day trial after adding a card. Prices are excl. VAT; tax is calculated at checkout. Workspaces on platform seats can ignore subscribe until they want to buy more.
Change paid seat quantity with the slider (cannot go below assigned seats)
Update card when payment fails (past due)
Cancel at period end or resume before it ends
Members
What this page is for
Members lists everyone with access. Use email invites for people you know; join-code requests are handled on the Approvals page.
Inviting by email
Open the invite flow and enter an email address
Choose a permission profile before sending — this sets their access from day one
Check Assign seat to give them full access on acceptance; leave it unchecked to add them as a guest
The recipient receives a join link by email
Pending invites appear in the members list until accepted or expired
Managing members
View role, permission profile, and status for each person
Change profile — reassign access without removing the member
Toggle the seat switch to grant or revoke a seat (needs an available seat to turn on)
Deactivate — revokes login and Pilot access; records they created stay in the CRM
Roles on this page
Owner / Admin — can open Setup
Member — Operations and Views only
Guest — no seat assigned; read-only standard objects, no Operations interaction
Join-code requests (someone who signed up and entered your workspace code) are reviewed under Setup → Approvals, not here.
Approvals
What this page is for
When a new user signs up and enters your workspace code, their request lands here until you approve or reject it.
Reviewing a request
Each row shows the requester’s name, email, and when they asked to join
Select a permission profile before approving — required for access to start
Assign seat is checked by default — uncheck it to add them as a guest instead
Approve — adds them as a member; they receive a confirmation email
Reject — dismisses the request; they receive a notification email
Badge & empty state
A count badge on Approvals in the sidebar shows pending requests
When no requests are pending, the list is empty — nothing to action
Email invites sent from Members skip this page because you pre-assign a profile when sending the invite.
Permissions
What this page is for
Profiles are reusable access templates. Assign them when inviting members, approving join requests, or creating API keys.
Profile list
Each profile shows how many members and API keys use it
Open a profile to edit object and field rules
Create profile — start from scratch with a descriptive name (e.g. Sales, Read-only)
Admin profile — locked full access; cannot be deleted
What profiles control
Object access — view, create, update, delete per record type
Field access — optional read/edit overrides per column
Pilot and REST API both enforce the active member’s or key’s profile
Create restrictive profiles before inviting people or issuing API keys. You can widen access later.
Record notes
View on an object includes reading its notes
Update includes creating and deleting notes (no separate notes permission)
Your export combines primary and related data in one row (common CRM contact exports)
You want Companies (or another object) created and linked without a separate import file
Each row shares a match key for the related record (usually company name)
How it works
Choose the related object type (e.g. Companies)
Map file columns to fields on that object (name, website, industry, etc.)
Pick the column that identifies each related record — rows with the same value share one related record
Choose the lookup field on the primary object that should point to the related record (e.g. Contact → Company)
OSTRATA creates or updates related records first, then creates primary records with the link set
Example
A contact export with columns Email, First name, Company name, and Company website: map Email and names to Contacts, enable embedded Companies, map Company name → Name and Company website → Website, set Company name as the match key, and link via the Company lookup on Contacts.
Duplicate handling applies to both
Related records use the same Create / Skip / Update mode as primary records
Companies and name-based objects match on normalized name
Validation shows separate create, update, and skip counts for primary and related records
If companies and contacts are in separate files, import Companies first, then import Contacts without embedded mapping.
OSTRATA POSTs JSON when selected objects are created, updated, or deleted.
Point each rule at a subscriber URL (your automation platform, custom service, etc.).
Header auth, basic auth, or HMAC signature — match what the subscriber expects.
Per-rule toggle to include bulk import events (off by default).
Editable test payload sends webhook.test without touching live records.
Inbound webhooks
External systems POST JSON to /api/webhooks/inbound/{id} with Bearer whk_… token.
Map JSON paths to CRM fields: create, update, or upsert on a target object.
Assign a permission profile to cap what the endpoint can write.
Event logs
Filter by direction (inbound/outbound), date, status, and webhook rule.
Inspect received payload, mapped fields, HTTP response, and record link.
Logs retained 14 days.
Example: n8n
These steps use n8n as a concrete reference. The same flow works on any tool that can receive authenticated POST webhooks or send Bearer-authenticated HTTP requests.
Outbound — In n8n, add a Webhook node: HTTP Method POST, Authentication Header Auth.
Copy the Production URL (e.g. https://your-n8n.example/webhook/abc-123).
In OSTRATA Setup → Webhooks → Outbound, add a rule: pick objects and events, paste the URL, choose Header auth.
Save and copy the header secret shown once. In n8n Header Auth, use the same header name (default X-OSTRATA-Webhook-Key) and secret value.
Activate the workflow, click Test in OSTRATA, and confirm the delivery in Event logs.
Inbound — In OSTRATA Setup → Webhooks → Inbound, create an endpoint, map JSON paths, and copy the URL plus whk_… token shown once.
In n8n, add an HTTP Request node: POST to the inbound URL, Bearer Auth, JSON body from the prior node.
Run the workflow and verify payload, mapped fields, and record link under Event logs (Inbound).
Changing authentication on an existing outbound rule generates new credentials on save. Update the subscriber credential (e.g. n8n Header Auth) before sending live traffic.
Authentication: Header Auth
Name: X-OSTRATA-Webhook-Key
Value: <secret copied from OSTRATA after save>
Method: POST
URL: https://your-ostrata.example/api/webhooks/inbound/<webhook-id>
Authentication: Bearer Auth
Token: whk_<token copied once from Setup>
Authorize Google Drive at the workspace level so Pilot can search files shared with the connected account.
Google Drive (here)
Connect — admin signs in with the Google account that owns or can access team files
Disconnect — revokes Drive access for the whole workspace
Refresh index — manually re-index Drive files for Pilot search (workspace admins)
Tokens are encrypted at rest on the server
Drive index refresh (manual)
After Drive is connected, OSTRATA builds a searchable index for Pilot. Admins can trigger a manual refresh from this page.
While indexing is in progress, the refresh button stays visible but cannot be clicked.
After the index is up to date, manual refresh is limited to once per hour. The one-hour window starts when indexing finishes successfully. Use the info icon beside the refresh button to see when the next refresh is allowed.
If indexing fails, you can force a refresh immediately — the hourly limit does not apply after an error.
Calendar & Gmail (not here)
Configured per member under Personal space → Connect
Pilot uses personal Calendar for scheduling and Gmail for inbox tasks
Personal Gmail does not grant Drive access
Members can use Calendar and Gmail before Drive is connected, but Drive search requires admin setup on this page.
If Telegram is disabled here, members cannot link even when the bot is configured globally.
French registry
What this page is for
Enable French registry enrichment for the workspace. When enabled, members can enrich companies from Operations (Pilot), from the Enrich button on a Companies record in Standard views, and admins can enrich from this page.
Creating a new company in Pilot or Standard views offers standard creation or registry-enriched context (INSEE fields only — no BODACC on create).
Disabled by default — no automatic enrichment when creating records without choosing the enriched path.
BODACC — legal announcements stored as pending events until approved
VIES — VAT validation when applicable
Approval & conflicts
In Operations (Pilot), fields you edited manually are not overwritten — Pilot shows pending diffs
In Standard views, Enrich asks you to confirm, then overwrites mapped registry fields on the company
Approve or dismiss BODACC / pending Pilot diffs from the company record banner or via Pilot follow-up
BODACC data includes DILA / Etalab attribution on display
Reopen the company record to act on pending registry changes — new registry diffs also appear in the notification bell when delivered as platform or job notifications.
Dirigeants import
List officers from the registry, then import selected dirigeants as Contacts
Natural persons map to first/last name; legal entities use full legal name
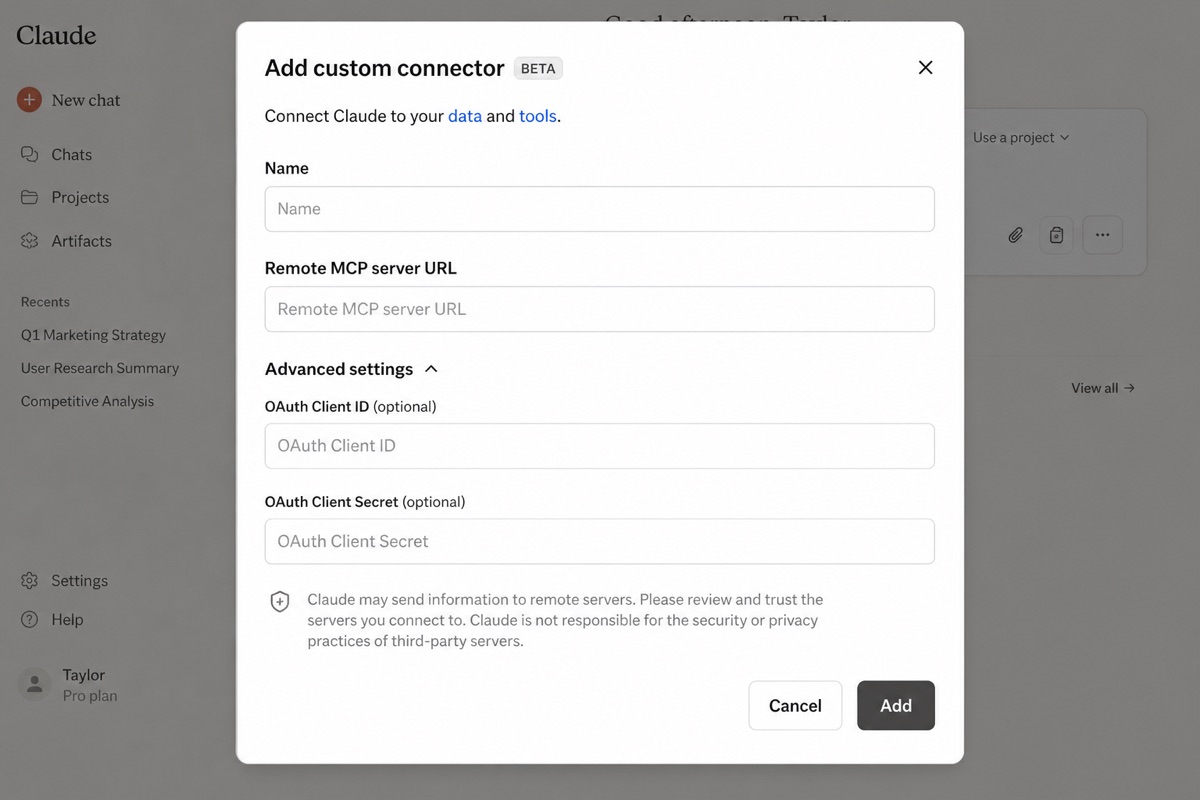
Create and manage personal MCP connections so Claude, Cursor, and other AI tools can read and write CRM data within your permission profile.
Each member has their own omk_ keys — separate from admin REST API keys (osk_) on Setup → API.
What MCP does
MCP (Model Context Protocol) lets external AI tools call OSTRATA on your behalf — search records, create contacts, update deals — with the same object and field access you have in Operations.
Step 1 — Create a connection
Open Personal space → MCP
Name your connector and create a connection
Copy the omk_ secret and OAuth Client ID + Secret immediately — OSTRATA cannot show them again
Store credentials in a password manager — never paste them into chat
Step 2 — Server URL
Use https://YOUR_APP/api/mcp (HTTPS required in production)
Copy the URL from the MCP page — it matches your current workspace host